Adho Mukha Vrksasana or handstand is a wish list pose for many yogis. It’s challenging, and holds a lot of child-like wonder. Not only that, but it’s a great way to test your focus. It can be really easy in other postures to let the monkey-mind jump around. But, the last thing you think about in handstand is making a to do list. Inversions, especially handstand, require focus. If that’s one of your reasons for practicing yoga, then working towards this posture might deserve a spot on your yoga bucket list.
Handstand also requires a strong base of the hands, arms and shoulders, active core for stable stacking, and reaching legs and feet to create lift. These are all components of other, less scary, postures, like High Plank, Down Dog, and Standing Splits. The adage of “tadasana or mountain pose in every posture” is definitely rings true here. Energetically, the peak expression of handstand embodies a beacon of light or energy shining down through the hands and radiating up through the feet. You can imagine the hands, arms, spine, legs, and feet make up a string of lights. If they aren’t stacked and perfectly taught, then the string of lights will flicker and may not shine at all. If all are stacked and taught, then a beaming line of light is created.
A break in this line of energy commonly occurs at the low back. When kicking up in to handstand, yogis like to “throw their booty” to get the hips over the shoulders. This creates an arched back and breaks the the danda or staff of the spine. To secure this break, keep the core engaged, you can think of the low ribs reaching toward the hips to keep the back long and core active. As you lift or hop into handstand, if this energy is maintained, then the middle of the body becomes a stable block that is stacked on top of the strong base of the hands, arms, and shoulders.
Here are just a few of my favorite kramas or stages for developing a stable handstand practice, these options specifically target keeping the core engaged, the back long, and moving into the pose mindfully.
 Option 1 – Inverted Down Dog at the Wall. This option gives you the security of the wall, but also encourages you to keep your back strong. Place the hands on the floor and walk your feet up the wall. Work to get the body into a 90* angle, with the hips directly over the shoulders. With shoulders engaged on the back and lots of space in the collarbone, pull the belly and ribs in, keeping the back long and strong. If hamstrings are tight soften the knees. While this option is stable it can be a little scary, to get the hips over shoulders it feels like you are actually taking them farther than that. It might help to work with a mirror or partner to compare what you are feeling to what is actually happening.
 Option 2 – Standing Splits Facing the Wall. Keeping the alignment in option 1, extend one leg toward the ceiling. Keep the hips square and reach through the ball of the foot.Take 5-10 breaths and then switch sides. If you are feeling confident, come to the ball of the foot on the wall. You can also tap away from the wall and come into handstand from this prep pose.
 Option 3 – Handstand hop with legs in an “L” shape. From standing splits or a short 3-legged dog, take a controlled hop. Resist the temptation to bring the bottom foot together with the top foot. Hops can range from itty bitty to full, so work where you feel comfortable, but challenged. Keeping the bottom leg down does two things. First, it keeps the core and back engaged, second, you can bring the leg down at anytime.
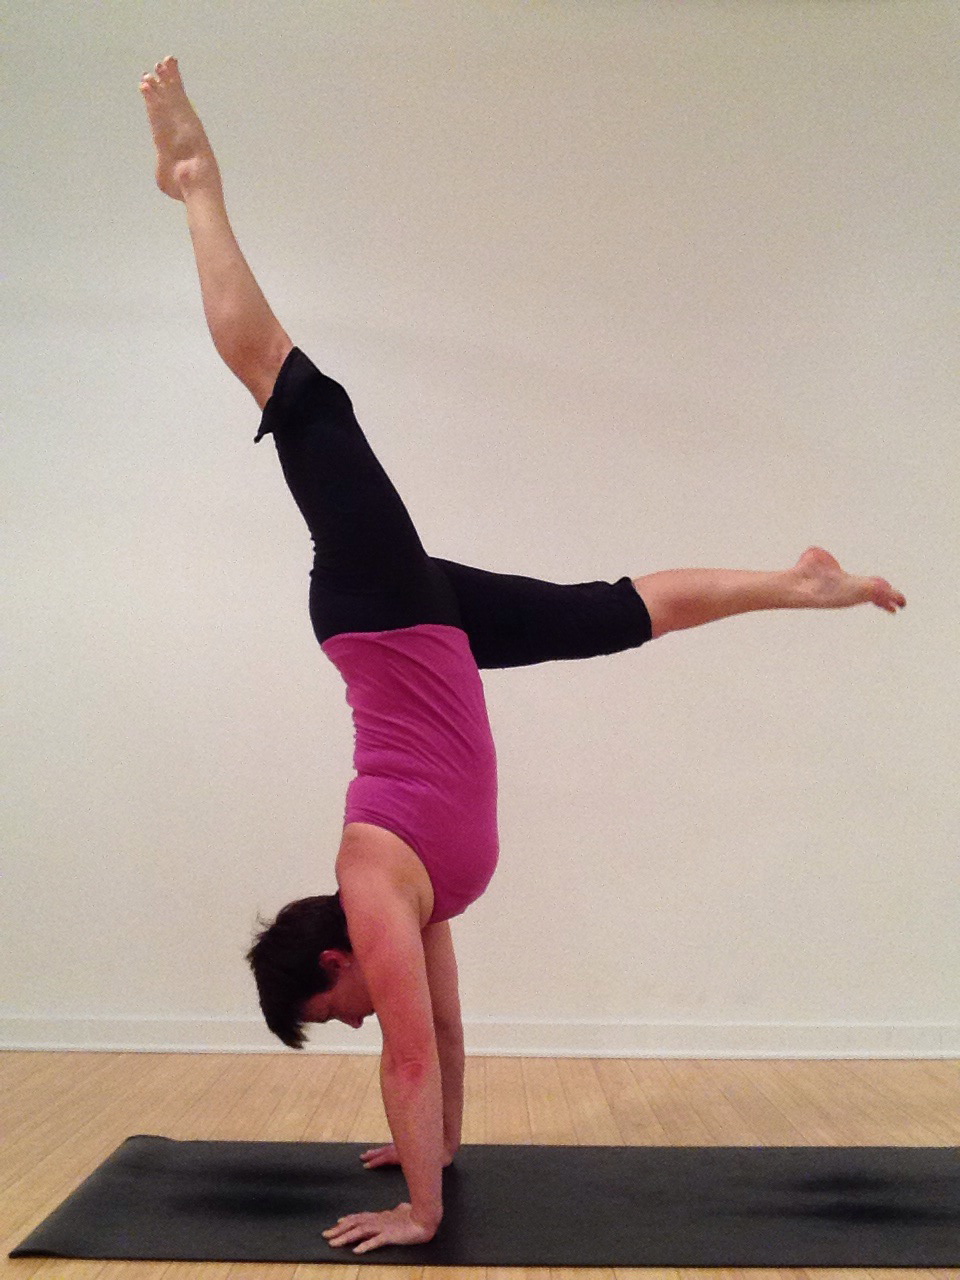
 Option 4 – Adho Mukha Vrksasana. When you feel secure in option 3, then slowly and with control, lift the bottom leg to meet the top leg. Nothing else changes. Keep pressing the floor away and reach the feet skyward. At first you might find a few seconds of hang time, but there may come a time when you’re up there a little longer and you think, “oh s&*t, what do I do now?”. Just breathe and when you are ready reach one leg to the ground.
With all inversions and arm balances, it’s important to come into them with control. Kicking, jumping, and flailing really have no value, in fact, these actions will only lead to injury. Moving slowly and mindfully, you can keep focus on all of the physical and energetic actions that make up a strong and stable practice. It is very natural to be afraid of inverting, if you are experiencing those feeling explore them!
Whatever aspects of this pose you refine this week, be sure to work where you feel challenged, but also where you can breath and relax around the work. Follow this weekly challenge @suzannewrightyoga on Instagram or at Suzanne Wright Yoga on Facebook. If you post your pictures or share about your experience be sure to tag #PowerPose and @suzannewrightyoga.

[…] 10. front body stretched out pose (purvottanasana) 11. handstand pose (adho mukha vrksasana) 12. handstand pose (adho mukha vrksasana)var.1 13. handstand pose (adho mukha vrksasana)var.2 14. […]